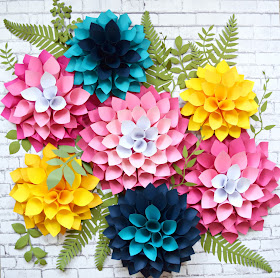
Easy Giant Paper Dahlias
I have a special treat for you all! I know many of my followers read my content to be on the lookout for freebies and any new flower designs I create for the shop.
I decided to create a dahlia for my 'Giant Paper Flower Book' that will be coming out soon, and also decided to post this item in the shops.
But today, you get a full step by step tutorial, full video (below) plus FREE printable PDF templates to make these lovely dahlias for yourself!
Click here for your printable PDF.
Make sure to open on a computer not a phone please.
I also had fun creating several new sets of vines and those can be found here in set 1 and the long vine here. (Freebie for 1 of the vines will be coming later!)
The giant dahlia is made from 2 basic geometric shapes a large 8 inch circle for the base plus several 4.5 inch and 4 inch squares rolled into a cones shape.
Step 1:
Start with cutting out 40—4.5 inch squares and 15—4 inch squares.
It’s important to note that the final count of squares used will vary for everyone, but the above count is a good starting place.
Step 2:
To form the cone hold the square with one corner up and overlap the bottom securing with your hot glue.
A 8 inch circle template is included in this book for the giant dahlia.
If you wanted a variety of sizes changing the circle size will easily increase or decrease the size. If you wanted a flower large then this I suggest cutting a 9-10 inch circle. Of course more squares will then be needed to fill the dahlia
Step 3:
Beginning with your larger cones made from the 4.5 inch square. Glue the tips to the inner edge of the circle all the way around. Make sure to leave about a 1/2 inch of space between the first layer of cones.

Step 4:
Next, continue adding cones in the spaces between the first layer of cones we put down.
Step 5:
You should be on top your 4 inch cones now. Continue the pattern and keep filling in more of the dahlia petals.
Step 6:
Once you get down to the last half dozen or so of cones, they will natural bend at the tip when you glue them in. This is what you want so that the final look is a tight dahlia center.
You may need to grab your dowel or rolling tool to press the tip down and make sure it makes good contact in the center for the final couple cones.
Watch full video!
Pin for later!


I like this one it's really beautiful ♡♡♡♡♡
ReplyDeleteI like this one it's really beautiful ♡♡♡♡♡
ReplyDelete